We’ve had a year full of growth and reached a milestone of 60+ team members; let’s take a moment to digest what that means for people operations. Hiring staff in 19+ countries is no easy task, but we are up for it, and I can honestly say it is the main reason why our culture is so great. That might sound biased coming from Crossref’s first Head of Human Resources, but hear me out.
You can now register rich metadata for a variety of record types in Metadata Manager using simple, guided workflows. The tool is used by many in our community to register grant and journal article records, and it has now been expanded to support books and chapters, reports, dissertations, and post-publication updates for journal content.
Metadata Manager makes it easier to capture identifiers for contributors and their affiliations, funding information, references, and more. Thanks to automated reference matching by Crossref, this offers greater visibility for the works, while the affiliations and funding information can serve as important trust signals for the community.
This year’s edition of the FORCE11 conference was hosted in June by Singapore Management University. Its title, “To Go Far, Go Together: Advancing Scholarly Communication Across Boundaries and Disruptions” truly resonates with Crossref’s truths; it takes a village! Crossref only works as long as the scholarly research community wants to work together globally, across all disciplines, for integrity and openness of the scientific record. The conversations were influenced by a genuinely diverse mix of librarians, researchers, open infrastructures, and service providers, and that mix shaped almost every interaction we had at the conference.
We have some rather unusual news to share: Crossref fees are going down again. At its meeting in Paris earlier this month, the Crossref Board approved two further recommendations from the Resourcing Crossref for Future Sustainability (RCFS) project: effective 1st January 2027, we will reduce the majority of Content Registration fees for all 25,000 members, and remove fees for back-year records altogether.
Content Registration fees haven’t increased in around 20 years, and this is the first significant change to them in that time—downwards. Since these fees account for the largest share of Crossref’s revenue (around 60%), and since every member registers DOI records, these changes reach further than anything we’ve announced under the RCFS project so far.
Registering your DOI records using OJS version 3.5
If you are a journal publisher who hosts your articles via Open Journal Systems version 3.5 (OJS 3.5), we strongly recommend that you use OJS’s built-in DOI deposit tools to submit metadata to Crossref. Using the built-in OJS DOI deposit tools will save you a lot of time and effort in the long run.
Below you will see two types of resources to help you manage and register DOIs via OJS 3.5:
Video instructions - this video will help you start registering DOIs for your journal articles in OJS 3.5
Text instructions - showing the DOI management and registration workflow below; we also have similar resources available for setting up DOI deposits via OJS 3.3 and 3.4
These resources will not guide you through installation of OJS 3.5, so please consult the documentation written by the Public Knowledge Project (or PKP) if you need to know more about how to install OJS 3.5 or upgrade from an older version of OJS.
New in OJS 3.5: DOI assignment, monitoring, and registration have moved to core functionalities in the OJS interface. There is now a dedicated DOIs page in the left-hand navigation where you can see the registration status of every submission at a glance and take necessary bulk action.
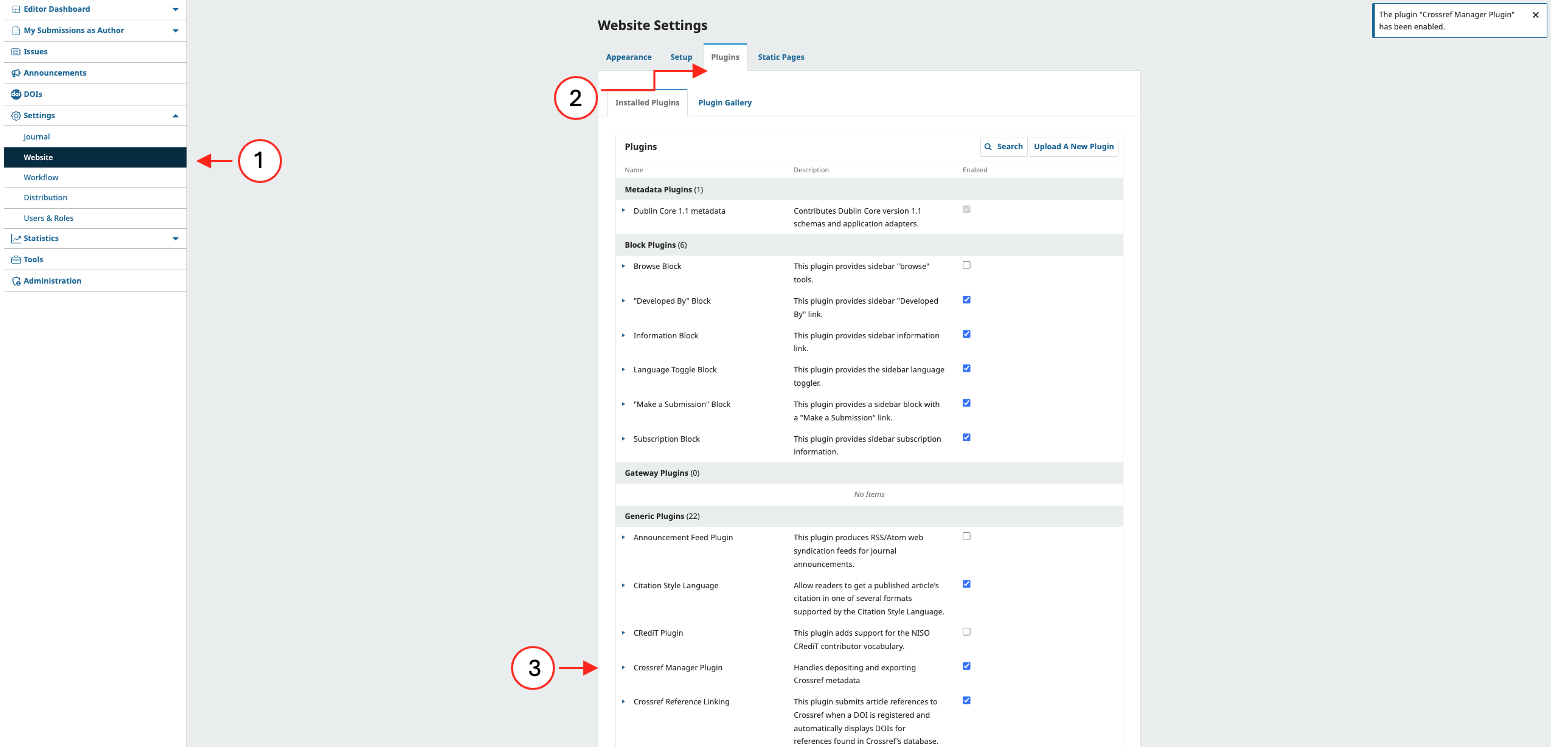
In order to deposit DOIs with OJS 3.5, you first need to enable the Crossref Manager Plugin.
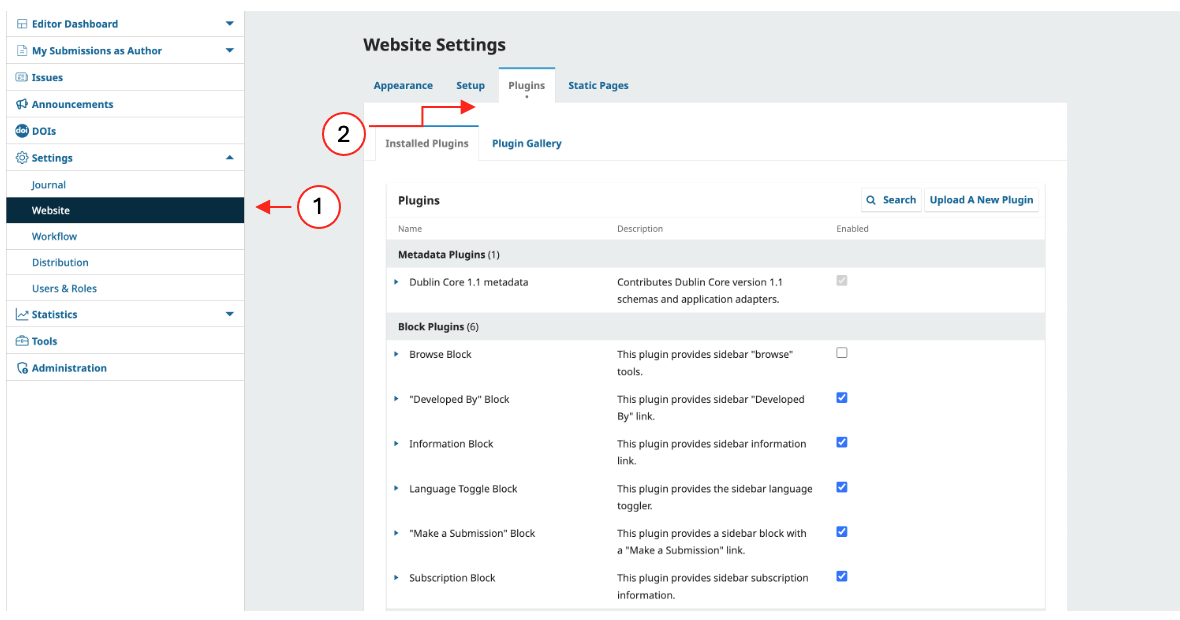
Go to ‘Settings’ > ‘Website’ > ‘Plugins’
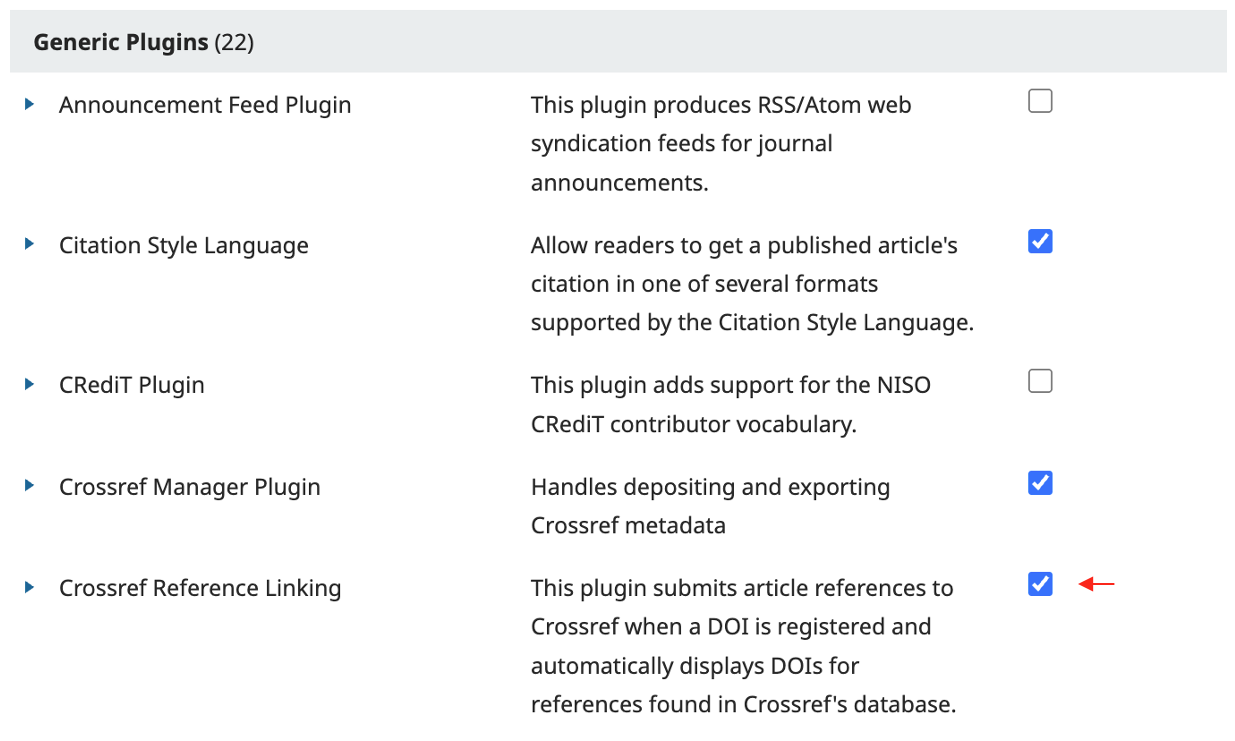
Under ‘Installed Plugins’, find the ‘Crossref Manager plugin’; the plugin will be listed under the Generic Plugins section
Click the checkbox next to the plugin description to enable it
Note: If you don’t see the plugin listed in the ‘Installed Plugins’ section, go to ‘Plugins’ > ‘Plugin Gallery’, search for ‘Crossref,’ and install the ‘Crossref Manager Plugin’ from there first. This will move the ‘Crossref Manager Plugin’ from the ‘Plugin Gallery’ to the ‘Installed Plugins’ section, where you will be able to enable the plugin.
Step 2: Configure DOI Settings
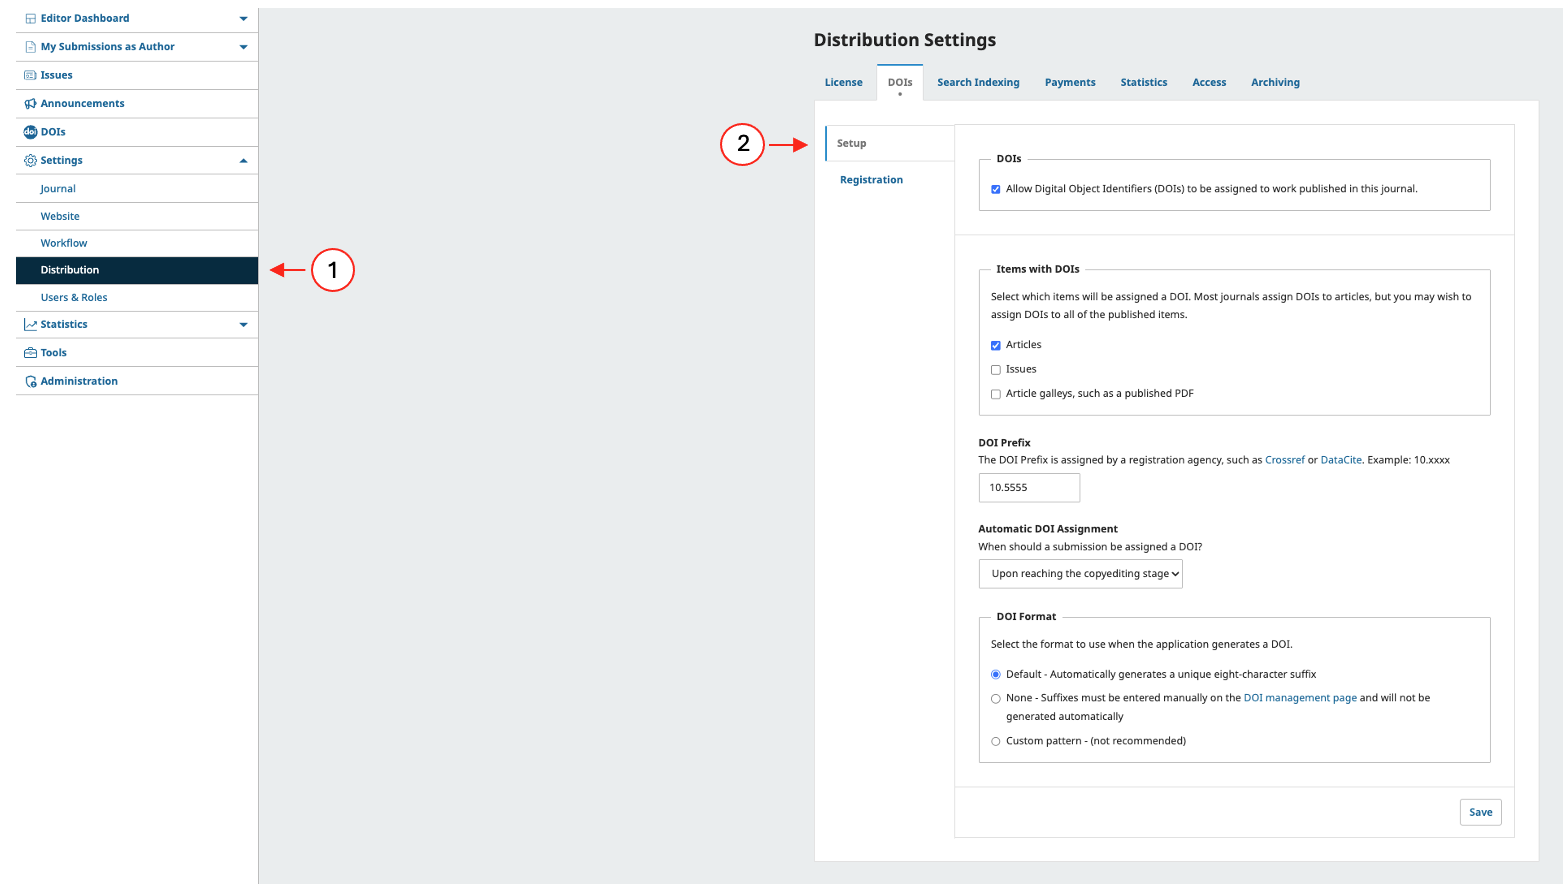
Go to ‘Settings’ > ‘Distribution’
Select the ‘DOIs’ tab
Click on the ‘Setup’ sub-tab
Check the box to ‘Allow Digital Object Identifiers (DOIs)’ to be assigned to your published content
Select which content types should receive a DOI (e.g., ‘Articles’)
Enter your Crossref-assigned ‘DOI prefix’. Your prefix will start with 10. and is in the format 10.xxxx (e.g., 10.5555)
Select your preferred stage for ‘Automatic DOI Assignment’ to your articles (this can be upon the article reaching the copyediting stage, upon article publication or never). Choosing ‘Upon reaching the copyediting stage’ allows DOIs to be assigned before the final publication is released, meaning that you can include those DOIs in the article fulltext PDFs. Selecting ‘Upon publication’ will mean that DOIs will only be assigned when your articles are published to your website.
Select your preferred method of DOI suffix generation: ‘Default’, ‘None’ (for manual entry of suffixes), or ‘Custom pattern (not recommended)’
Finally, click save
Note: In the ‘Items with DOI’ section, we recommend you choose ‘Articles’ only.
Crossref strongly recommends that you use the default format, which produces a random and opaque DOI suffix. You can see more information about the best practices for Constructing your DOIs.
Step 3: Configure your Crossref credentials
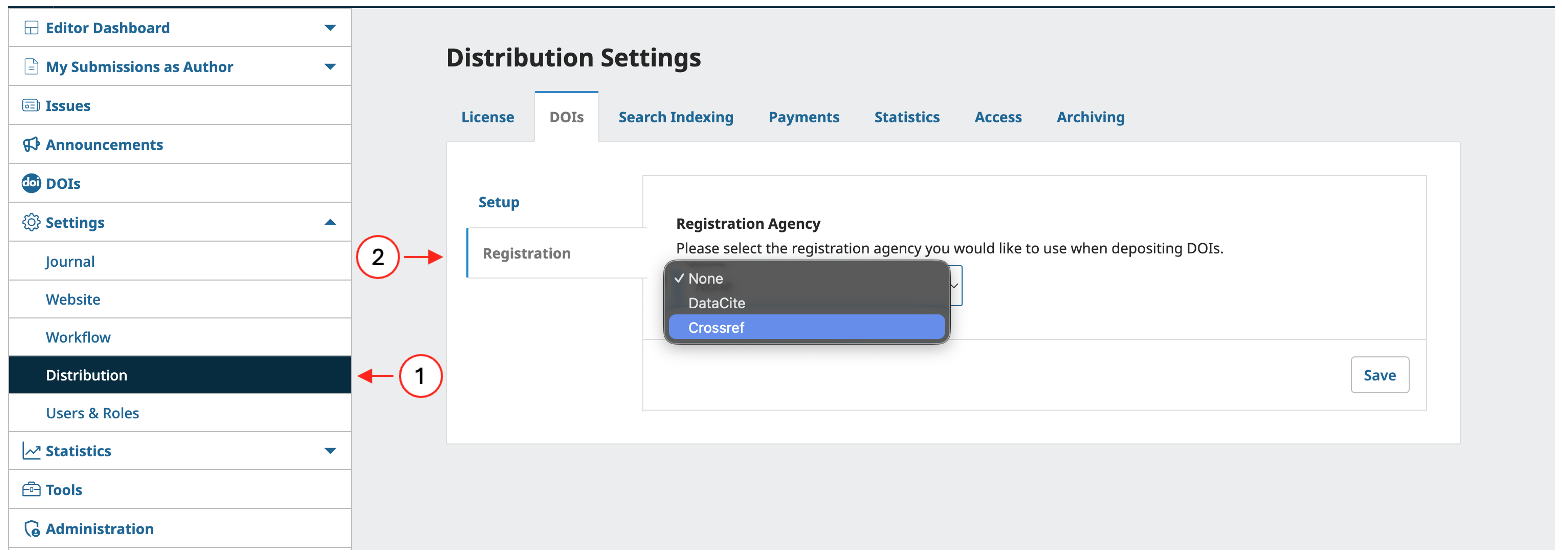
Still under ‘Settings’ > ‘Distribution’ > ‘DOIs’, switch to the ‘Registration’ sub-tab
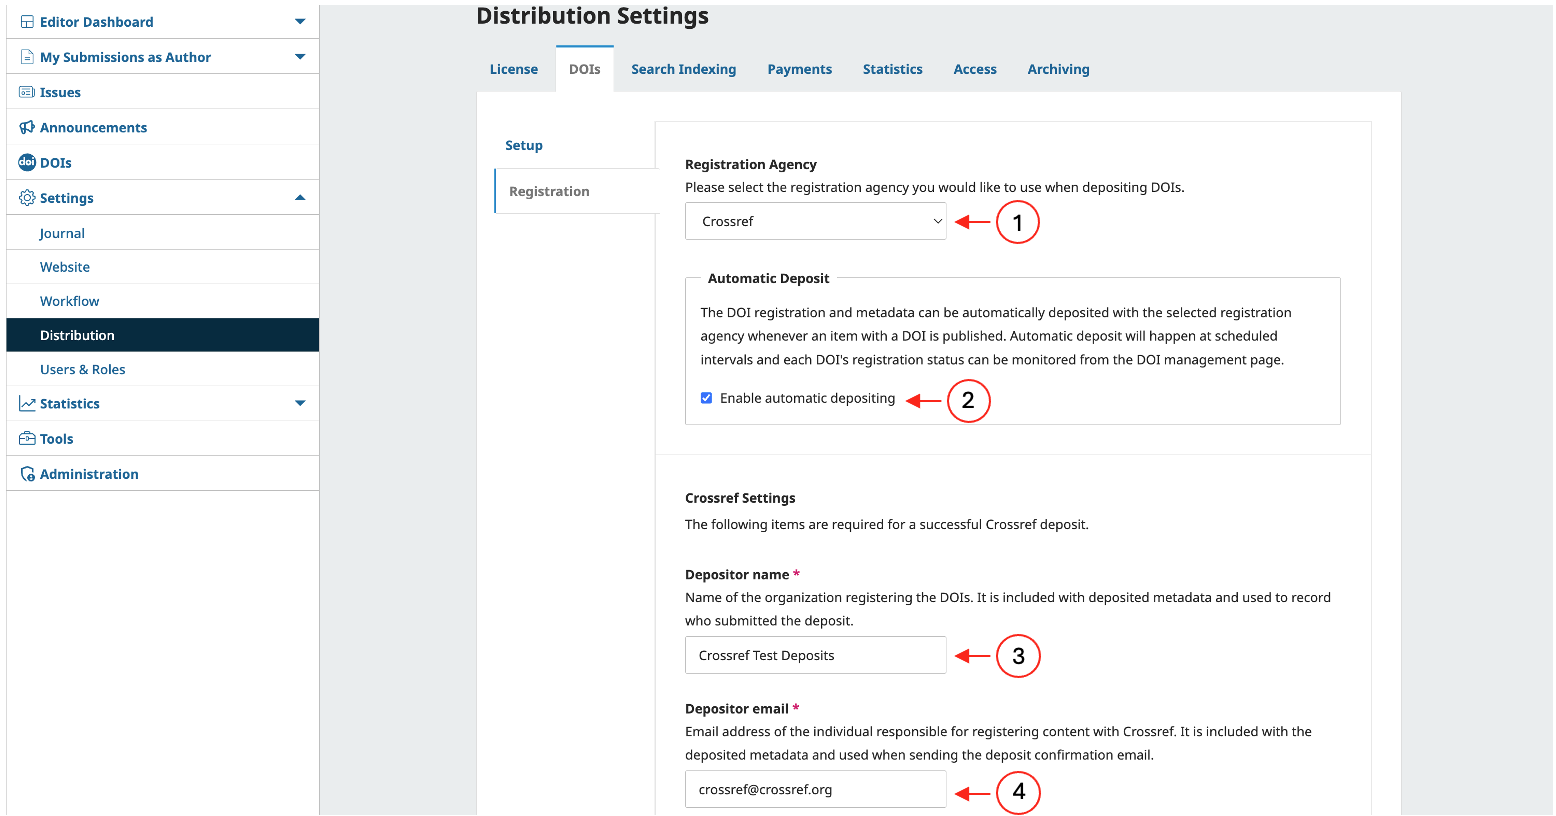
Select ‘Crossref’ as your ‘Registration Agency’ from the drop-down options (if ‘Crossref’ isn’t listed, go back to ‘Plugins’ > ‘Plugin Gallery’ and confirm the ‘Crossref Manager plugin’ is installed and enabled — see Step 1.)
Check the box under ‘Automatic Deposit’ to ’enable automatic depositing’ of DOI records from your OJS instance
Enter your organization’s name in the ‘Depositor name’ field
Enter your email address in the ‘Depositor email’ field
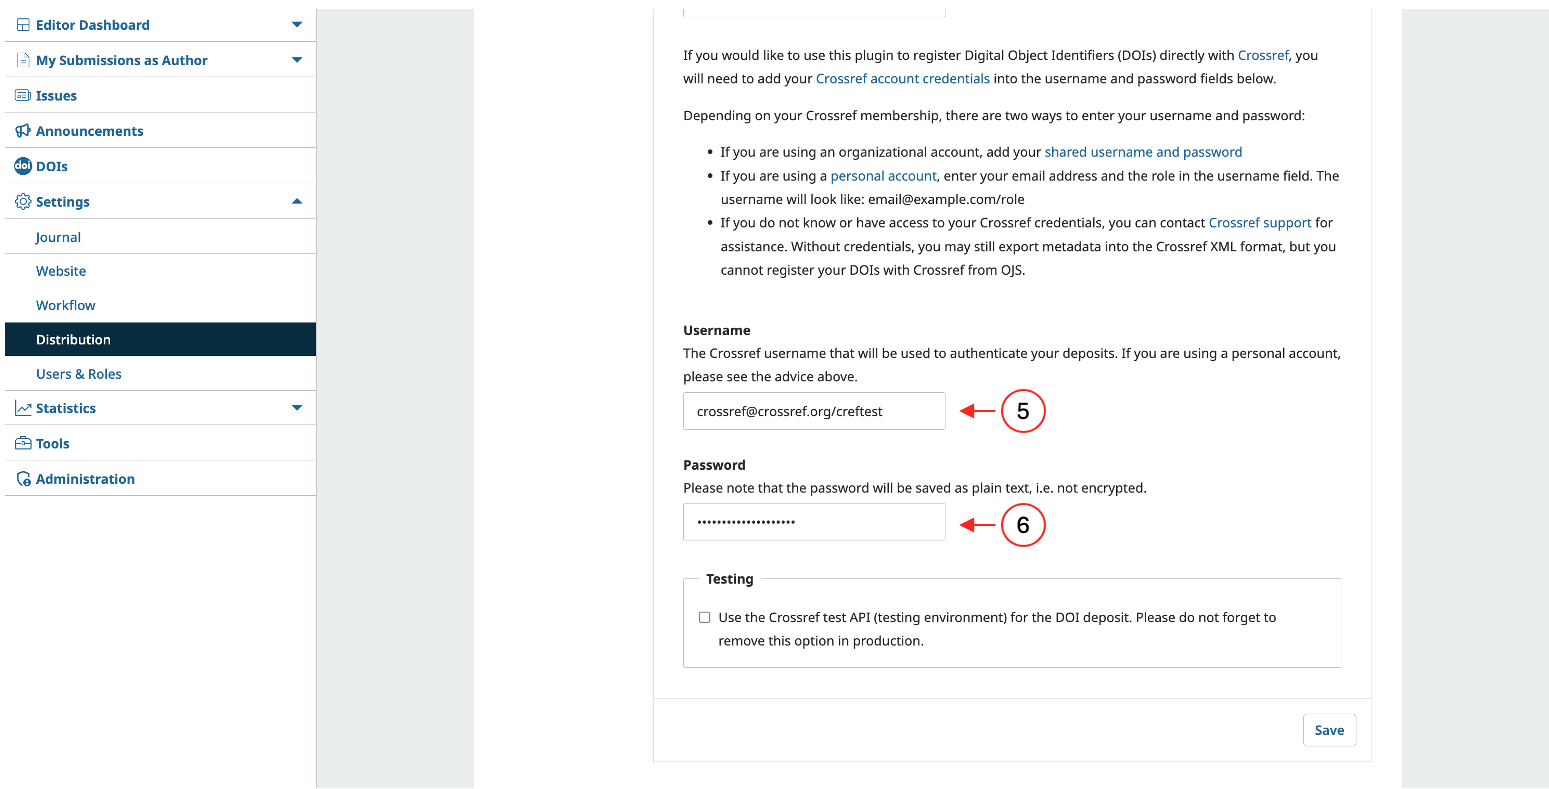
Enter your assigned Crossref ‘Username’; For example: support@crossref.org/abcd
Note: if the combination of username and password is incorrect, OJS will return a ‘401 unauthorized status code’ error at the time of registration. This error indicates that the username and password are incorrectly entered. That is, they do not match the username and/or password set with Crossref.
If you are using organisation-wide, shared role credentials (i.e. your username is a collection of letters), you can simply add in your shared username and password.
If you are using personal user credentials that are unique to you (i.e. your username is your email address), you’ll need to add your email address and your role into the username field, and your personal password into the password field. Here’s an example of what this will look like:
Username: email@address.com/role Password: your password
Enter your Crossref password into the ‘Password’ field
IMPORTANT: Leave the ‘Testing’ checkbox unchecked
Click save
Step 4: Monitor, manage, and register your DOI records
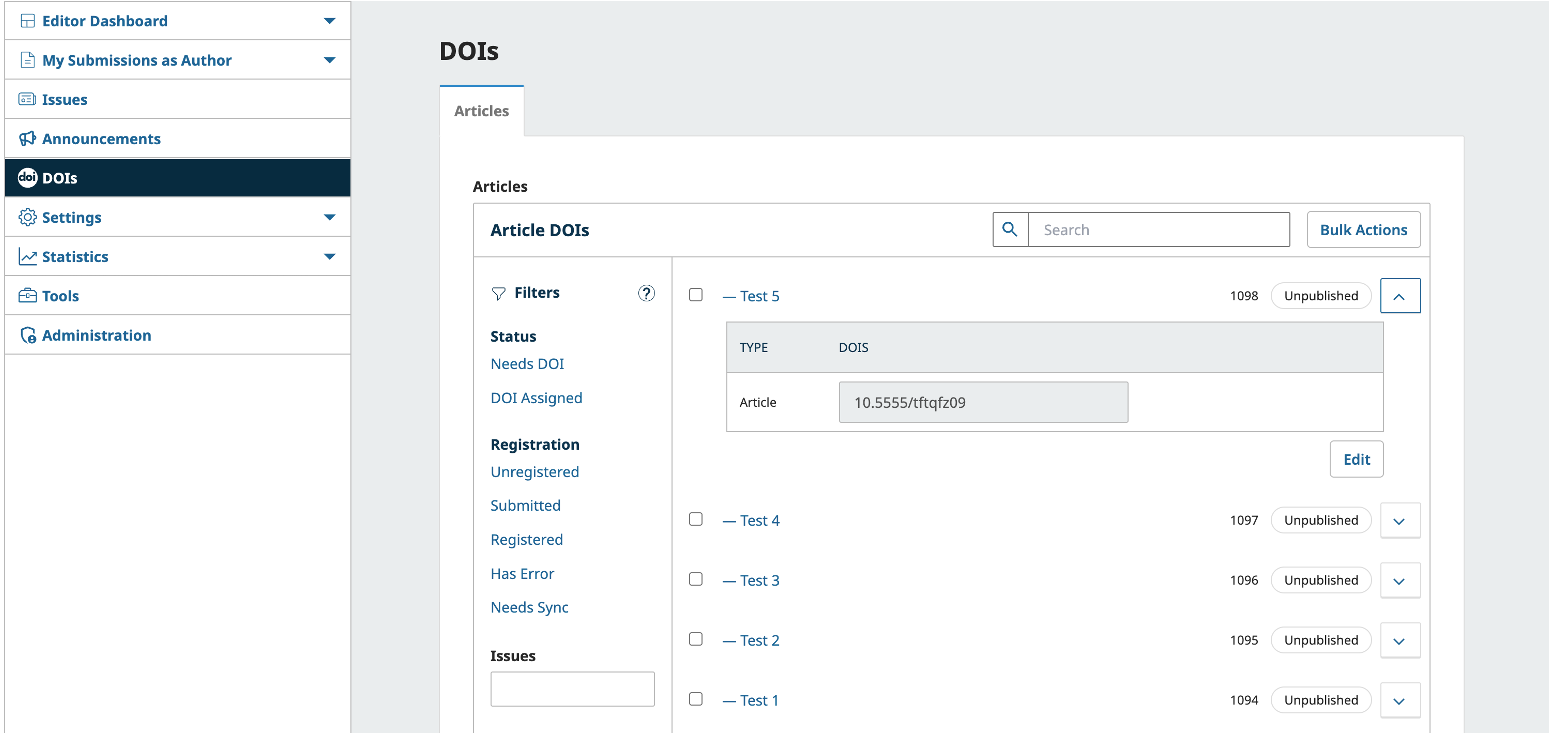
Once your DOI settings and credentials are saved, use the new ‘DOIs’ page in the left-hand navigation menu to manage DOIs going forward. From here, you can see the status of all DOIs by navigating to the relevant tab.
On the left side of the window, you can filter submissions two ways: by whether a DOI has been assigned (‘Needs DOI’/ ‘DOI assigned’), and by registration status - ‘Unregistered’, ‘Submitted’, ‘Registered’, ‘Has Error’, or ‘Needs Sync’.
If you selected ‘Automatic Deposit’ in the step 3, new DOIs will automatically deposit whenever you publish a new article. However, if you have already published some articles that you just assigned DOIs to, you’ll need to trigger a metadata deposit manually so that those DOIs are properly registered. It’s also a good idea to do this any time you update an article’s metadata - for example, if you add ORCID IDs, ROR IDs, or reference lists to an article’s metadata record.
To trigger a manual metadata deposit:
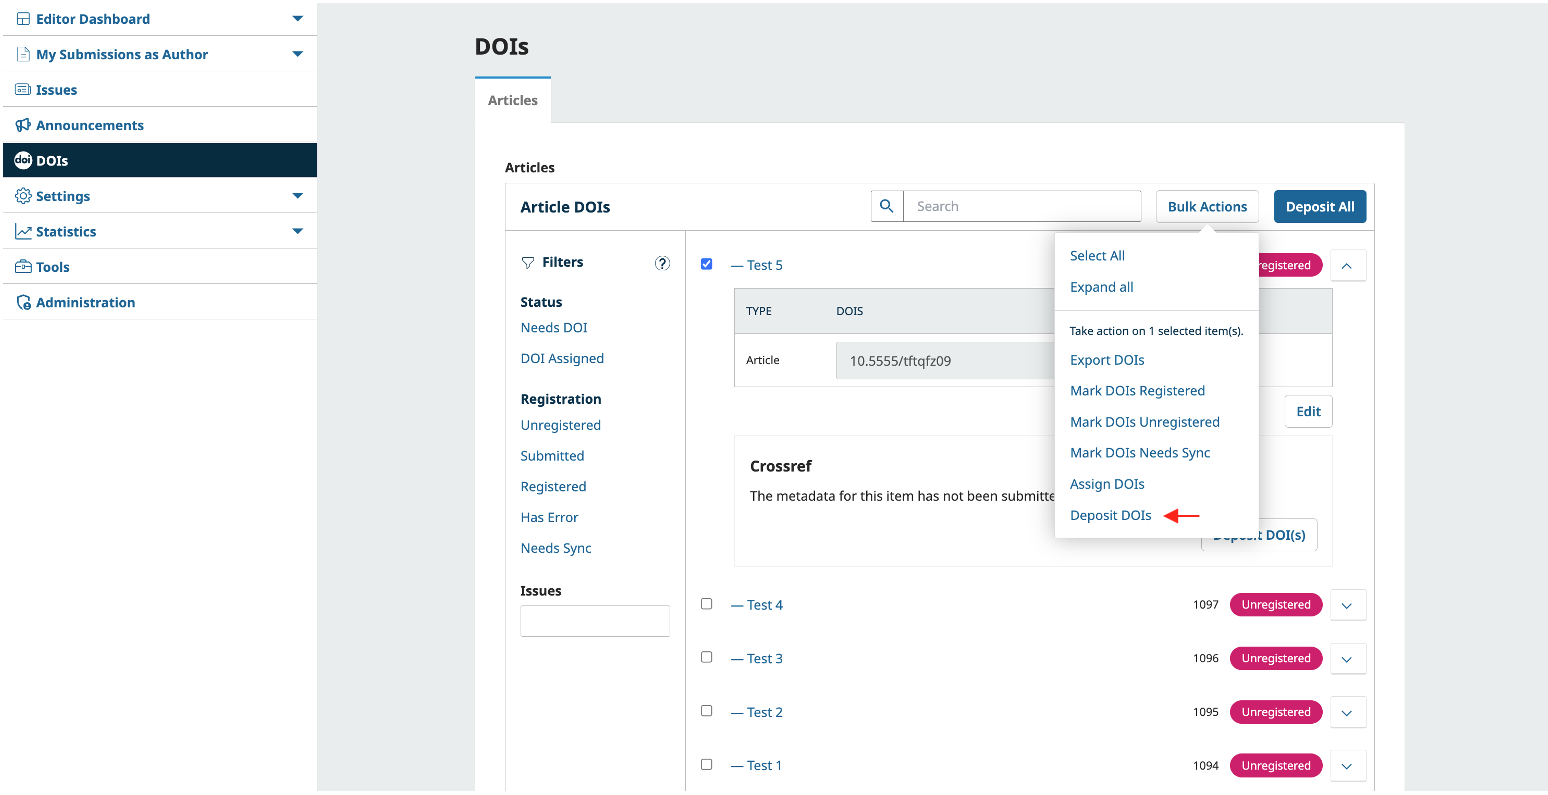
Select the articles whose DOIs you wish to deposit
Click ‘Bulk Actions’
Click ‘Deposit DOIs’
A confirmation popup will appear; click ‘Deposit DOIs’ again to proceed. If the deposit is successful, you’ll see a success message. When the task completes and the DOIs are functional, the status will update to ‘Registered’. If the deposit fails, you’ll see a specific error message - for example, a 401 error related to incorrect user credentials. For more information about moving existing DOIs into your OJS instance as a result of journal title transfer please visit our Community Forum.
Step 5: Activate the OJS references plugin
The OJS references plugin is available from OJS 3.1.2 onwards. The plugin will use the Crossref API to check against plain text references and locate possible DOIs for articles. The plugin will also allow the display of reference lists on the article landing page in OJS and deposit them as part of your metadata deposit. Linking references is a requirement of Crossref membership.
Workflow Settings
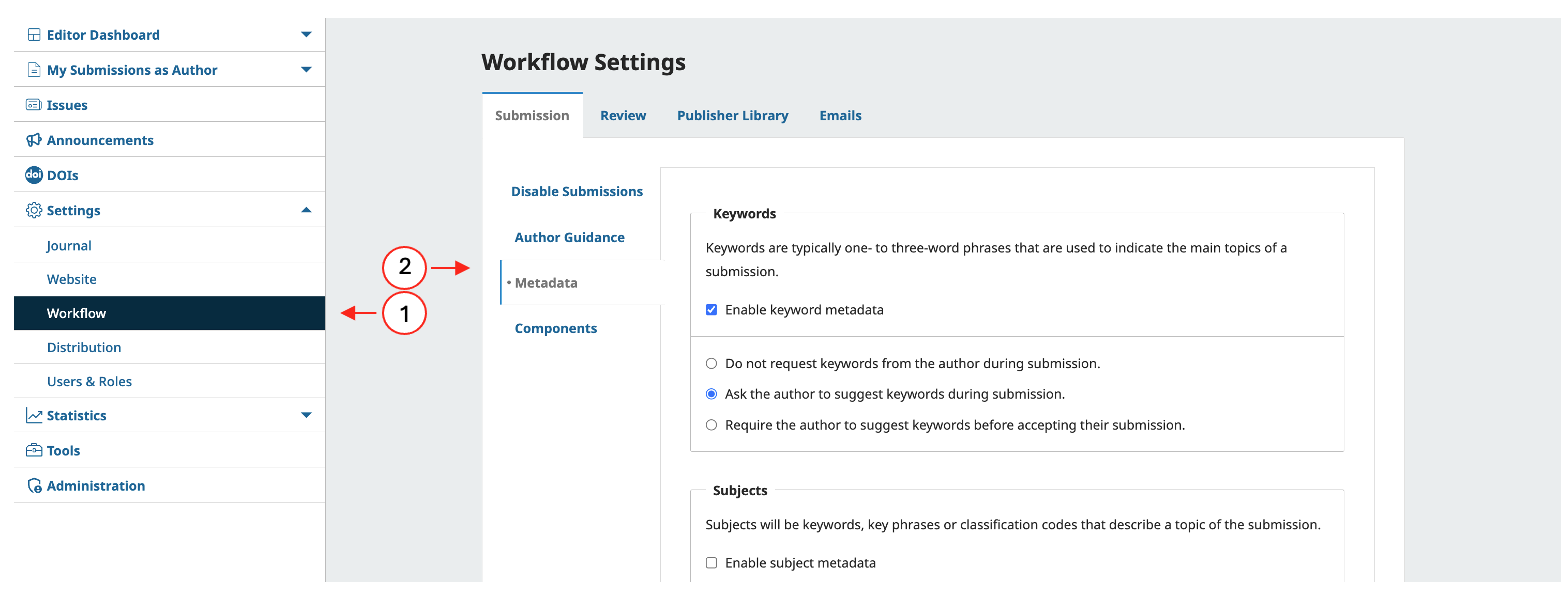
Click ‘Settings’ and then ‘Workflow’ from your dashboard
Under the ‘Submission’ tab, choose ‘Metadata’
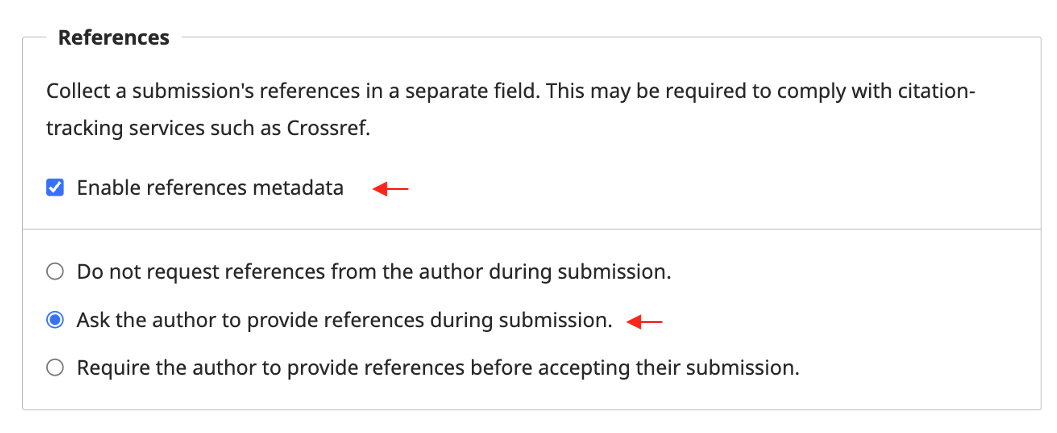
Scroll down to the bottom and find the ‘References’ section
Make sure you enable references metadata by clicking the checkbox ‘Enable references metadata’. You also need to select the option ‘Ask the author to provide references during submission’.
Click save
Website Settings
Then you need to activate the references plugin on the website, too, by following the instructions here:
Click ‘Settings’ and then ‘Website’ from your dashboard
Choose the ‘Plugins’ tab
Search ‘Crossref reference linking’
Click the ‘Crossref Reference Linking’ checkbox
This plugin will deposit the references that you enter into the XML deposit.
Additional OJS plugins for Crossref
In addition to the Crossref XML plugin for OJS, there are also other important plugins that can be enabled in OJS to enrich your metadata records:
Funding Metadata plugin - as of OJS 3.1.2, it is possible to enable a funder registry plugin for submitting funding information to Crossref. The plugin will use the Open Funder Registry to check against existing funding agencies. The plugin will include funding information in your Crossref DOI deposits.
Affiliation and ROR ID - ROR (Research Organization Registry) support for contributor affiliations is now a core function of OJS - it no longer requires a separate plugin. Contributors can also now have more than one affiliation, rather than being limited to a single institution.
ORCID - As of OJS 3.5, the ORCID plugin is no longer required - all ORCID-related functionality has been integrated into the core. To enable it, check the ORCID functionality checkbox under the users & roles tab and enter your credentials. Once ORCID functionality is enabled, users can connect their ORCID iD in three ways: From their profile, during submission or at account creation.
Getting help with OJS plugins
The team at Crossref didn’t create these plugins - they were either created by the team at PKP, or by third-party developers. Because of this, we aren’t able to give in-depth help or troubleshooting on problems with these plugins.
If you need more help, you can learn more from PKP’s Learning OJS 3.5 docs plus there’s a very active PKP Community Forum that has more information on how to modify your OJS instance to submit metadata and register DOIs with Crossref.