Research is rarely limited to a single contributor performing a single role. Behind every research output are people contributing in various ways: software development, data analyses, methodology design, and much more. Often, the same person contributes in several of these ways. Until now, Crossref metadata could only capture part of that picture, but this is changing with Schema 5.5.
Through user experience research (UXR) initiatives that take into account our diverse membership and community, we can have a continuous, deeper understanding of the role of metadata in our members’ workflows, and ensure that our work continues to meet our community’s needs. Your support is the key to this process, and will positively impact the wider community - and if you’d like to start today, you can take part in our latest initiative: help us improve our Events page by sharing your thoughts on the page’s feedback form.
Our 2026 Community Update took place on 13 May. Two calls, one for the eastern and one for the western time zone, highlighted how our global community is growing, how we’re refining the metadata that supports trust in the scholarly record, and connecting records more effectively through our latest tools.
Funding is one of the key enablers of the research lifecycle, but has been one of the hardest parts of the scholarly record to identify, describe and connect. This is slowly changing as we have recently reached a very exciting milestone for Crossref’s Grant Linking System (GLS). What makes it remarkable is not only the numbers reached, but where the data comes from. Research funders, who joined Crossref as members, have actively contributed more than 200,000 grants to the Research Nexus (Figure 1).
The conflict report shows where two (or more) DOIs have been submitted with the same metadata, indicating that you may have duplicate DOIs. You’ll start receiving conflict reports if you have at least one conflict.
As you know, a DOI is a unique identifier — so there should only ever be one DOI for each content item.
Fix conflicts as soon as you can as they could lead to problems in the future. Having two separate DOIs for the same content means researchers won’t know which one to cite, and this risks splitting your citation count. You may also forget you have two DOIs, and update only one of them if your URLs change. This means anyone using the DOI you haven’t updated will come to a dead link. The good news is that it’s very quick to eliminate this bad metadata and solve the problem.
Conflicts most often occur for two reasons:
The metadata registered for content isn’t sufficient to distinguish between two items. For example, items like Book Reviews, Letters, and Errata often share a single page and have no author
Two or more records have the same metadata (but different identifiers), suggesting that duplicate records have been created.
Conflicts are flagged in your submission log when a conflict is created. We also record all current conflicts in the conflict report on our website - if you do not see your member name on the conflict report page, you have no outstanding conflicts. If you have active conflicts, we’ll remind you via email each month. However, if your conflict level has increased by 500+ then we’ll let you know right away, as this indicates a bigger problem. If your organisation has more than one prefix, you’ll receive a separate email for each prefix.
What should I do with my conflict report?
On the conflict reports page, you can locate your organisation to see the conflicts. Please be patient, as the page can take a long time to load. You can view conflict details as an XML file or by title (see View conflicts by title below) as a simple .txt report.
Click your organisation’s name to see which titles have the problem.
Click each title to show a report that displays the DOIs in conflict.
Alternatively, you can see the conflict reports for your whole prefix by clicking on the .xml link.
Other information includes:
conflict ID is the unique ID number for the conflict.
cause ID is the deposit submission of the DOI causing the conflict.
other ID is the deposit submission of the affected DOI.
You can also examine the conflicts for a particular publication by clicking on the title in the expanded view. This will display a text file where:
ConfID is the unique ID number for the conflict.
CauseID is the deposit submission of the DOI causing the conflict.
OtherID is the deposit submission of the affected DOI.
JT is the publication’s title.
MD is metadata for the DOIs. Metadata for DOIs in conflict will be the same.
DOI is the DOI involved in the conflict.
Parenthetical value following the DOI (such as Journal and 4508537-N in this example) lists all the conflicts in which the DOI is involved and the resolution status of that conflict.
ALERT, if it appears, indicates that the DOIs have more than one conflict, which can occur if they were deposited repeatedly with the same metadata. This field lists the other conflict IDs and their status:
null – Not resolved
A – Made an alias
P – Made a prime
U – Resolved by a metadata update
R – Manually erased or resolved
Resolving conflicts
There are three scenarios to cause two (or more) DOIs to be submitted with the same metadata.
Scenario 1: You assigned two DOIs to distinct content items, but accidentally submitted the same metadata for both of them. In this case, one of the DOIs has incorrect metadata. If you update and resubmit the deposit to correct that DOI’s metadata, the conflict will be resolved.
Scenario 2: You assigned two DOIs to the same content item. In this case, you can resolve the conflict by assigning one of the DOIs as primary and the other as its alias. The alias DOI will automatically redirect to the primary DOI, so you’ll only need to maintain the primary. Learn more about creating aliases between DOIs.
Scenario 3: The two DOIs refer to different content items, but their metadata is so similar that a conflict was flagged. This happens when items have very little metadata included. The best thing to do is to register more metadata to remove the conflict. If you can’t do this, you can accept the conflict - learn more about accepting conflicts as-is.
If you have any further questions about your conflict report, please contact us.
Update your metadata
If a conflict exists because the metadata you’ve deposited is sparse, you should re-register your content with additional metadata. The conflict status will be resolved when one (or both) items are re-registered with distinctive metadata. To be sure that the system updates the correct record, include the relevant DOI in your submission.
When making an update, you must supply all the metadata for the content item, not just the fields that need to be changed. During the update process, the system completely overwrites the existing metadata with the information you submit, including inserting null values for any fields not supplied in the update.
If the new metadata resolves the conflict, the system returns a message such as this one (which resulted from a redeposit of the metadata for DOI 10.50505/200702271050-conflict):
If you have registered multiple records for the same content, you can alias the duplicate items to the (primary) record you intend to maintain. Records are aliased at the identifier (DOI) level. When DOIs are aliased, one DOI is flagged as the ‘primary’ DOI - the DOI you intend to maintain in the future. The remaining DOIs are aliased to the primary DOI at the DOI resolver level. This means that when someone clicks on an aliased DOI link, the user is automatically redirected to the URL registered for the primary DOI.
For example, if the metadata for 10.1103/PhysRev.69.674 and 10.1103/PhysRev.69.674.2 are the same, you might make 10.1103/PhysRev.69.674 the primary DOI. In this case, metadata queries that match both DOIs will resolve to 10.1103/PhysRev.69.674, and DOI queries for either 10.1103/PhysRev.69.674 or 10.1103/PhysRev.69.674.2 will both return results.
You can assign primary status to DOIs in conflict one-by-one using the admin tool, or you can assign primary or alias status to multiple DOIs by uploading a .txt file.
Conflicts involving DOIs owned by other members must be resolved by Crossref - please contact us for help with this.
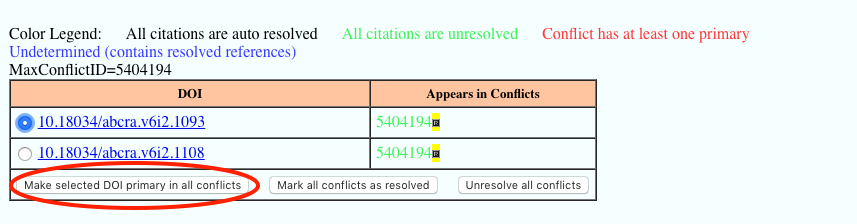
Assigning primary status from within the admin tool
Use op=alias when the primary DOIs are not known. If there are more than two DOIs involved in the conflict, the operation will be rejected because the system cannot determine which DOI to make primary.
All the DOIs listed in the file will be assigned the status you specified in the op element. The system will send you a message like this one for an individual DOI:
<record_diagnostic doi="10.1088/0368-3281/5/6/313">
<conflict status="Success" ids="48983,49365,49783,50243,51067">
<msg>Marked as alias</msg>
<doi_list>
<doi>10.1016/0368-3281(63)90014-7</doi>
</doi_list>
</conflict>
</record_diagnostic>
or this one for multiple DOIs:
<?xml version="1.0" encoding="UTF-8"?>
<doi_batch_diagnostic>
<submission_id>1181263946</submission_id>
<record_diagnostic doi="10.5555/prime">
<conflict status="Success" ids="23135669,2311211">
<msg>Marked as alias</msg>
<doi_list>
<doi>10.5555/a1</doi>
<doi>10.5555/a2</doi>
</doi_list>
</conflict>
</record_diagnostic>
</doi_batch_diagnostic>
Accept conflicts as-is
If you’ve determined that the content flagged with conflicts are not duplicate items, you can remove the conflict status by setting the status to ‘resolved’. This has no impact on the metadata records or DOIs but will remove the conflicts from our conflict report.
In some cases, you may want to leave conflicting or ambiguous records in our metadata database. You can do this within our admin tool, or by uploading a .txt file to our admin tool.
Your conflict resolution file will be added to our submission queue and processed. A log will be sent to the email address you provided in the file header. Be sure to review the log to make sure your conflicts were resolved correctly.
Forcing prime/alias
You can force a DOI to be an alias of another DOI even if the DOIs are not in conflict. Please contact us to discuss if this would be a suitable solution for your situation.
Extreme care MUST be taken when using this feature. Normally two DOIs are put into a prime/alias pair when their metadata is the same and a conflict is created. In this case, a metadata query will find both DOIs but because of the forced aliasing will return the prime DOI. If an aliased DOI has very different metadata from a primary DOI, the match may be a false positive.
To force an alias between two DOIs, create a text file as described below and upload to the admin tool.
Create the .txt file with tab-separated pairs of DOIs as follows: